Review
The filters suggested by the Fraud Protection Advanced tool at the time of onboarding are capable of automatically detecting and rejecting fraudulent payments with high precision. But there may be a few suspicious payments you feel require human judgment to take appropriate decisions. You can place such transactions for manual review by creating a filter with the decision label, Review.
The review process helps you or your analyst team to take a second look at the details of suspicious payments and analyze with your expertise in your business domain to understand whether a payment is fraudulent or legitimate and then decide what action to be taken.
Here are a few example scenarios where you may want to review payments:
- Number of chargebacks linked to a phone are higher than a certain limit in last 90 days
- Number of issuer declines linked to an email are higher than a certain limit in the last 7 days
- The transaction amount is higher than a certain amount and the transaction risk score is greater than a certain limit
- You may also use Review to check a filter's performance in real-time before it starts approving or rejecting payments
- An email domain Blocklist. Domains cover a wide range of transactions and hence sometimes it might make sense to review transactions that have certain domains associated.
All payments tripped by the Review filters are parked on the Review page and the decision for these payments in the back end is sent as “Review” to merchants. You can consume the decision (Review) to your internal systems to be notified about the transactions that are under review.
Review Page
The Review page lists the payment transactions (a/k/a “cases”) that are pending for review and approved / rejected as well. You can open each case in a detailed view, which is known as Single Case View, to thoroughly review and approve or reject it based on your analysis. In your analysis, if you discover any details such as IP, Email, Address or Card-BIN hash associated with fraud or legitimate payments, you can mark them as Blocklisted or Allowlisted respectively for future use.
The Review Page has the following two tabs:
- Pending
- Approved / Rejected
Pending
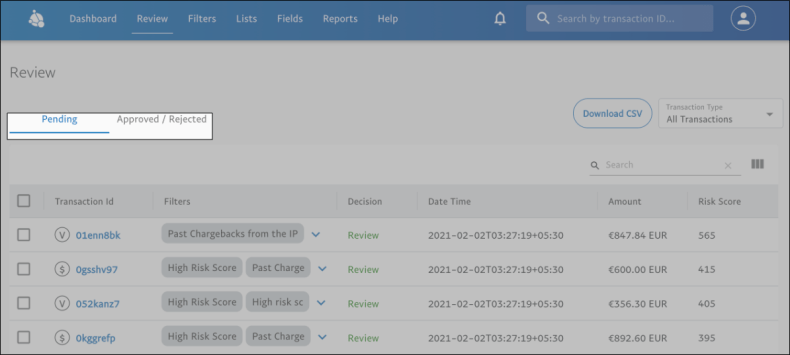
Click this tab to view the list of cases pending for review and make a decision. The list is displayed in a tabular format with the following columns:
- Transaction Id: displays the transaction IDs of cases. By clicking it, the Single Case View with all the transaction details opens
- Filters: displays the filter names that triggered transactions for manual review
- Date Time: displays the date and time the transactions were added to the review list
- Amount: displays the amount of the transaction
- Risk Score: Risk Score is a score that is assigned to a transaction by the Transaction Risk Score filter. A threshold of 1000 denotes the riskiest transaction, and 0 the least risky
- Transaction Type: displays the type of transaction. If the transaction type is Verification, it is indicated by 'V' icon, and if the transaction type is Sales, it is indicated by '$' icon.
Note: The transaction type for all transactions is also displayed in the Single Case View: next to Transaction Id in the Highlights tab, on the graph icon and node information in the Graph View, and in the Linked Transactions section. The Transaction Type drop-down is available in the Linked Transactions section as well, and it allows you to filter and view transactions based on transaction type (for more information, refer to 'Search by Transaction Type' below). Further, the transaction type can be selected from Transaction Attributes during filter creation (for more information, refer to Add Conditions).
A case listed in the Pending tab is available until 30 days from the day it has been added to the review queue. If no action is taken on the case within 30 days, the case gets expired and is moved out of the review queue.
Approved / Rejected
Click this tab to view the list of cases that are already reviewed, and an appropriate decision is made.
Search
The Search option in the 'Pending' and 'Approved / Rejected' tabs help you find the specific cases you are looking for. You can search for a case in the list by specifying its transaction ID, date and time, or score. The moment you start typing in the Search box, the list gets filtered and displays only the cases with the transaction ID, date and time, or score that match the characters you typed.
Note: Issuer Declined transactions processed starting November 2021 will be searchable.
Search by Transaction Type
On the Review page, by default, all types of transactions are displayed both for Pending as well as Approved / Rejected. You can search / filter transactions by transaction type, Verification or Sales from the Transaction Type drop-down on the Review page.
Download CSV
There is also an option to download cases listed on the Review page as a CSV file if required to perform any offline analysis. You can download all cases or only specific transactions.
To download all cases in the list:
- Select the check box in the header row of the table and click Download CSV.
To download specific cases:
- Select the checkboxes of the transactions you want to download and click Download CSV.
Decision
You can make an appropriate decision (approve or reject) on cases directly from the Review page as well. You can take a decision on a single case or multiple cases at a time. This option is helpful when you want to take the same decision on multiple cases in one go.

To approve a case:
- On the Review page, click the Pending tab.
- Select the case on which you want to make a decision. The Decision button is displayed.
- Click Decision. The Make a decision dialog box is displayed.
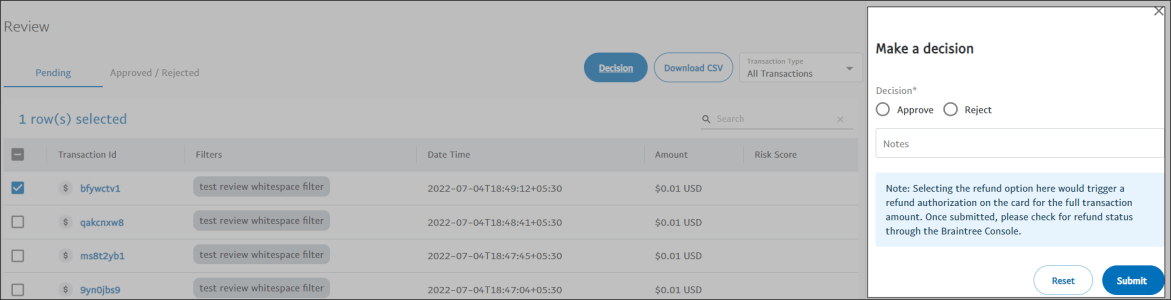
- Select Approve.
- In the Notes box, add a brief description to your decision.
- Click Submit.
To reject a case:
- On the Review page, click the Pending tab.
- Select the case on which you want to make a decision. The Decision button is displayed.
- Click Decision. The Make a decision dialog box is displayed.
- Select Reject.
- Issue a refund - Selecting this option initiates a refund and the status of the case is changed to Refund Initiated.
- Don't issue a refund - Selecting this option rejects the case.
- Issue a refund - Selecting this option initiates a refund and the status of the case is changed to Refund Initiated.
- In the Notes box, add a brief description to your decision.
- Click Submit.