Single Case View
Manual review of cases requires further details about each payment to analyze and make appropriate decisions. You may end up spending a significant amount of time in gathering the required information from various sources and then perform review, which is a time-consuming process.
The Fraud Protection Advanced tool facilitates Single Case View that provides various details about each payment at one place, aiming to ease the manual review process. With Single Case View, you can quickly evaluate the details and make appropriate decisions. Along with the seamless review process, Single Case View also lets you add information types associated with payments to Blocklist or Allowlist, if noticed while reviewing the details.
You can open a case in Single Case View using one of the following ways:
-
Search by transaction ID
- If you know the transaction ID, enter it in the Search by transaction ID box present on the top banner. If the transaction ID is available in the system, the link to it is displayed and by clicking the link, the case opens in Single Case View.
-
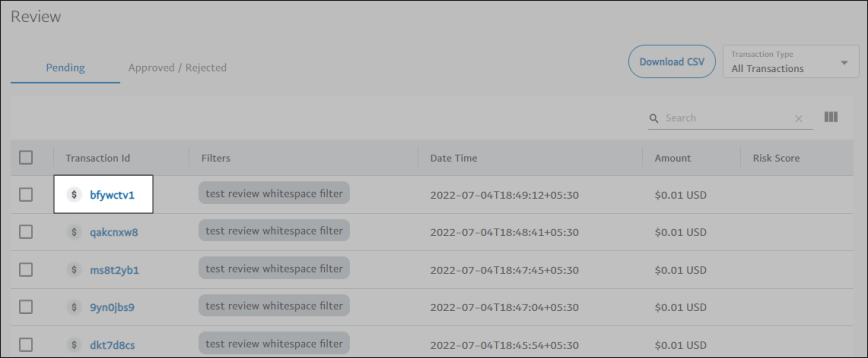
Review Page
- Open the Review page and click the Pending tab.
- In the Transaction Id column, click the transaction ID of the case you want to view, and it opens in Single Case View.
Single Case View presents the data using the following tabs:
- Highlights
- Graph and Linked Transactions
- More Details (New)
Highlights
The Highlights tab provides the effective details (insights) of a transaction on a single page. Bringing all the required details at one place reduces the review and decision-making time significantly.
The following are the various details of a case highlighted in this tab in the form of tiles.
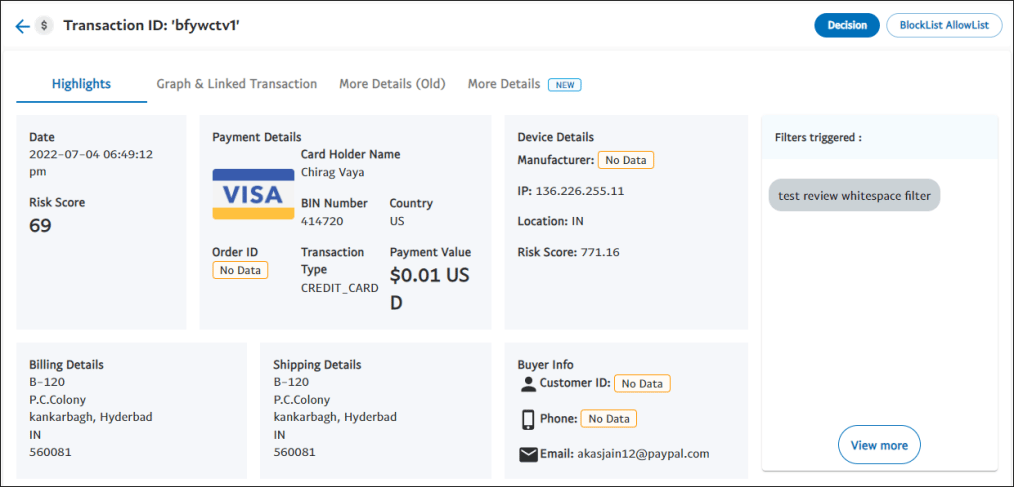
Date
Displays the date and time when the transaction took place. It also displays the Risk Score of the transaction.
Payment Details
Displays the following payment details:
- BIN Number: Bank Identification Number of the card used to make the payment
- Country: The country from where the payment has been made
- Transaction Type: The type of payment method
- Transaction Value: The amount of payment made
Device Details
Displays the device used, manufacturer of device, and IP address through which the payment has been performed.
Billing Details
Displays the address specified to send the billing information.
Shipping Details
Displays the address specified to ship the product.
Buyer Info
Displays the following buyer information:
- Customer ID: A unique identification number of the buyer received from merchant
- Phone Number: The contact number used to place the order
- Email: The email address used to place the order
Filters triggered for this transaction
Displays the filter names triggered for this transaction.
Favorites
Displays trends of variables (velocity, custom fields, and others) that are marked as favorites on the More Details (New) tab.
Note: This section appears in the Highlights tab only if at least one variable is marked as favorite in the More Details (New) tab.
Buyer Details across Braintree
Displays various aggregations computed on attributes such as phone, email, IP, billing address, and so on for the past 180 days and 1, 7, 30, or 90 days based on the data availability.
Graph and Linked Transactions
This tab displays a graph view of the case and a list of transactions that are linked (have connections) to the case.
Note: The values of the velocity variables in the Graph View are updated on daily basis.
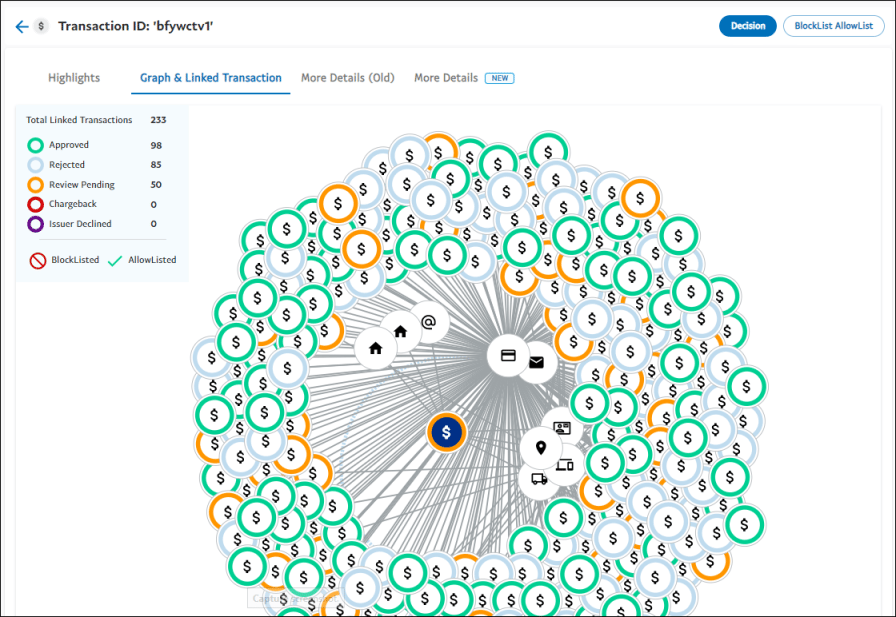
Graph
The graph displays a graphical representation (graph view) of the case and its details along with links to other transactions for better view and analysis.
In the graph view of a case, the case is always represented with a dollar icon in the center and is surrounded by two circles. The color surrounding a dollar icon represents the state of the case. That is, approved, rejected, under review, found chargeback, or declined by an issuer.
In the inner circle, the information types such as phone, email address, shipping address, email domain, and so on, provided while making the payment are displayed with appropriate icons.
In the outer circle, the transactions that have links to any of the information types in the inner circle are displayed. For example, a transaction made using the same phone number used for the transaction open in the graph view is displayed in the outer circle with a connecting line to the phone icon.
The graph view also highlights the cases that are added to Blocklist and Allowlist using the following symbols.
| Symbols | Description |

|
Blocklisted |

|
Allowlisted |
Actions
By clicking a transaction icon (including icons in the outer circle), a dialog box appears displaying the transaction details such as transaction date, amount (USD), shipping country and Zip, merchant currency code, and so on. Also, displays a hyperlink arrow—clicking it opens Single Case View of that case in a new browser tab.
Similarly, when you click any information type icon in the inner circle, a box appears displaying the attribute along with fields pertaining to it. For example, if you click the phone icon, a box appears showing the phone number and fields such as Number of transactions across
Working with Graph view
In the graph view, you can perform the following activities:
- Zoom in and out the graph: You can zoom in and out the graph in the workspace. If you are using a mouse device, rotate the wheel button forward to zoom in and backward to zoom out. If you are using a laptop, on the mouse pad, pinch with two fingers to zoom in or out. Otherwise, slide down with two fingers to zoom in and slide up to zoom out.
- Move the icons: The graph view allows you to drag the icons available in the graph. To drag an icon, click the icon and drag it within the workspace.
- Move the graph: You can move the graph within the workspace. To move the graph, click and move the graph. Or, you can also click anywhere in the workspace and move the graph.
Linked Transactions
The Linked Transactions list displays transactions that are linked to the case opened. For example, a transaction made using the same phone number used for the transaction is displayed in the Liked Transactions list. Similarly, there could be other information types that link transactions, and these linked ones are displayed in the Linked Transactions’ list.
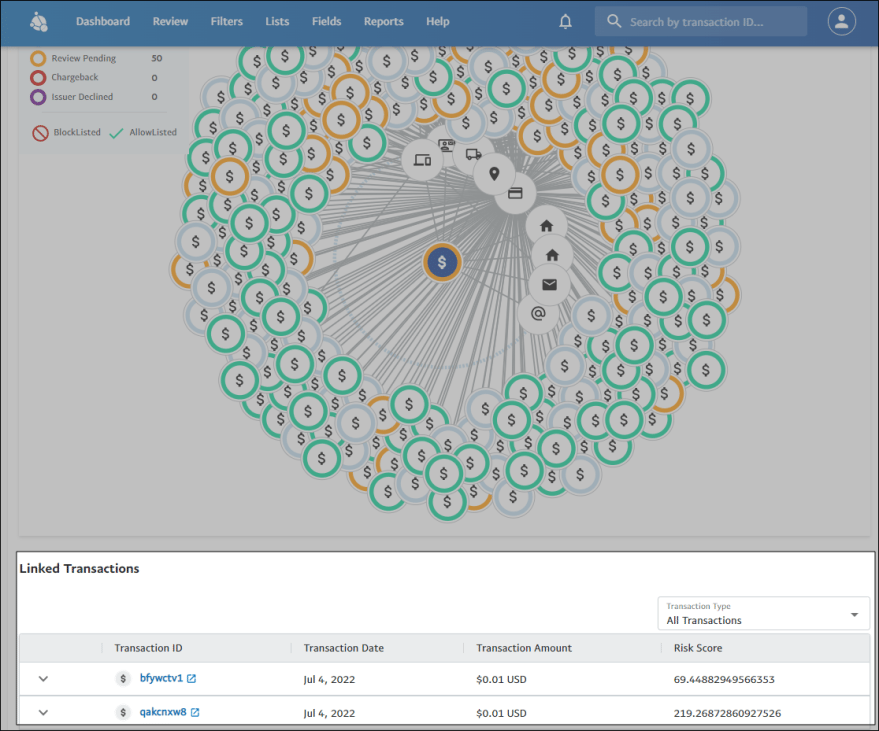
All linked transactions are listed in a tabular format with the following columns:
- Transaction ID displays the ID of the transactions. By clicking a transaction ID link opens Single Case View of that transaction in a new browser.
- Transaction Date displays the date when the transactions took place.
- Transaction Amount displays the purchase amount (USD) of the transactions.
- Risk Score is a score that is assigned to a transaction by the Transaction Risk Score filter. A threshold of 1000 denotes the riskiest transaction, and 0 the least risky.
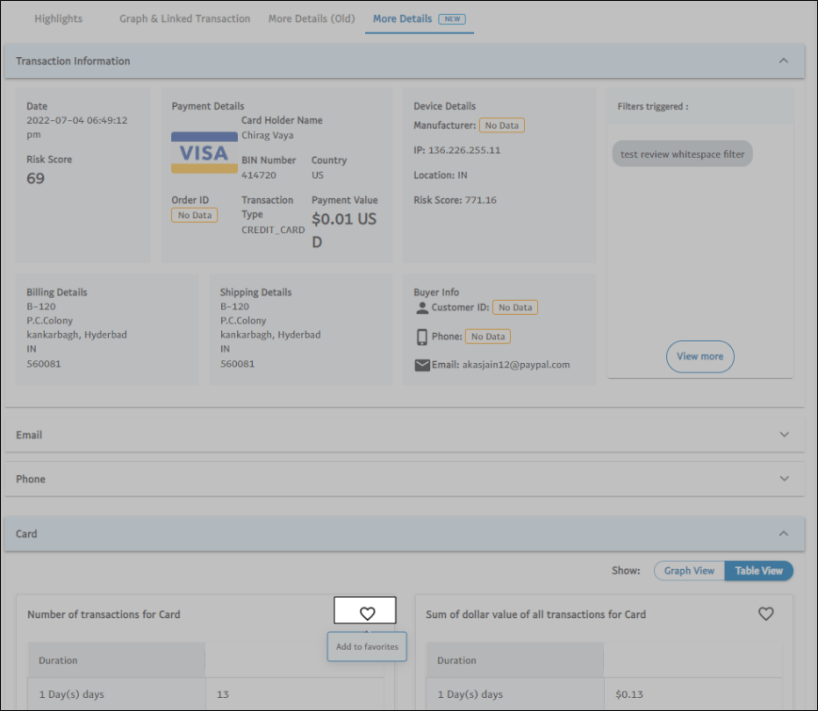
More Details (New)
The More Details (New) tab displays the following transaction details (in accordions) and the corresponding aggregations along with values.
Note: The values of the velocity variables in More Details (New) are calculated at the time of fraud evaluation.
- Transaction Information
- Phone
- Card
- Device
- Ip
- Customer Id
- Bill Country
- Ship Country
- Domain
- Custom Fields
- Others
When you open the More Details (New) tab, the Transaction Information accordion will be expanded by default. The Transaction Information accordion has the same information that is displayed in the Highlights tab.

You can expand and collapse the view of each accordion. The data for attribute accordions is displayed in a graph view as well as in a table view with corresponding aggregations and values.
Add Favorites
You can mark trends of variables (velocity, custom, and others) in accordions as favorites, and they are displayed in the Favorites section on the Highlights tab.
- Open the Review page and click the Pending or Approved / Rejected tab.
- In the Transaction Id column, click the transaction ID of the case you want to view, and it opens in Single Case View.
- Click the More Details (New) tab.
- Expand an accordion, and click the Add to favorites icon corresponding to a variable.
The variable marked as favorite is now available on the Highlights tab.
Decision Panel
The decision panel on the right side of the Single Case View has hide/show capability. A toggle on the upper-right corner is provided to hide or show the panel. From the Decision Panel you can perform the following functions:
- Make a decision
- Add attributes to Blocklist/Allowlist
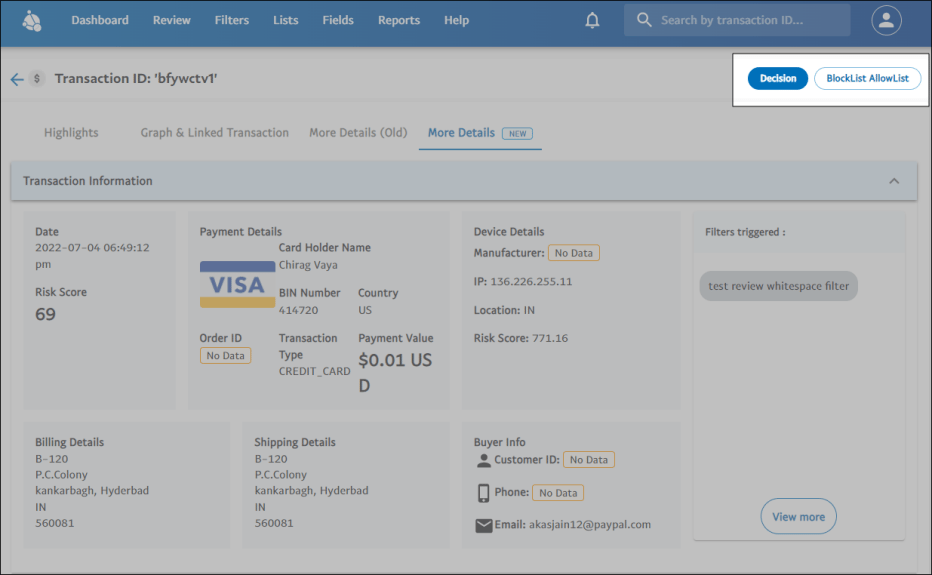
Make a Decision on the Case
You can make an appropriate decision (approve or reject) on the case opened in Single Case View.
To approve a case:
- In the Make a decision section, click Decision. The Make a decision dialog box is displayed.
- Select Approve.
- In the Notes box, add a brief description to your decision.
- Click Submit.
To reject a case:
- In the Make a decision section, click Decision. The Make a decision dialog box is displayed.
- Select Reject.
- Issue a refund - Selecting this option initiates a refund and the status of the case is changed to Refund Initiated.
- Don't issue a refund - Selecting this option rejects the case.
- Issue a refund - Selecting this option initiates a refund and the status of the case is changed to Refund Initiated.
- In the Notes box, add a brief description to your decision.
- Click Submit.
Add Transaction Attributes to Blocklist/Allowlist
During your review process, in case you identify a transaction attribute, such as name, IP address, and phone number, associated with that payment as a fraudulent or illegitimate one, you can add them to Blocklist or Allowlist from the Transaction Review page rather than navigating to Lists and adding them manually to individual lists.
To make Blocklist or Allowlist work, you must create a filter. To learn more, see Lists.
To add an information type to Blocklist:
- In the Blocklist Allowlist section, click the harmburger menu (3 dots) against the information type and then click Add to Blocklist. A confirmation dialog box appears.
- Click Confirm.
To add an information type to Allowlist:
- In the Blocklist Allowlist section, click the harmburger menu (3 dots) against the information type and then click Add to Allowlist. A confirmation dialog box appears.
- Click Confirm.
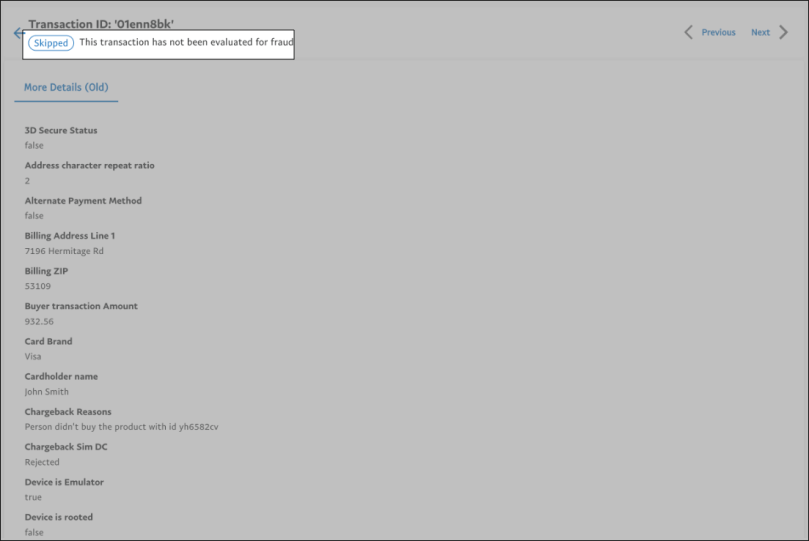
Skipped Transactions
Transactions that are skipped for fraud evaluation can be searched and viewed in the FPA application through Transaction ID search. This enables you to distinguish between a skipped transaction and a fraud evaluated transaction.
A label is displayed for all skipped transactions with details, such as the Payment Method, Transaction Amount, Card brand, and so on as shown in the following image: