Filter Simulations
Whenever you make any change(s) to filters, you can simulate the impact of the change to the combined filters performance before saving the changes to take effect. The change to the Filters section could include any of the following:
- Create a new filter
- Enable or disable a filter
- Modifications to the conditions in active filters
When you test a change or create a new filter, a simulation with test results is generated for thorough review. The simulation displays the performance forecast when the change is applied. This helps you in identifying, and thereby optimizing the performance of the filters.
Note: The performance forecast is simulated by including new filters, and all active filters along with the change.
The simulation forecasts the performance using same metrics that are displayed on the Filters page. The forecast is computed based on the historic transactions on which the decision is already taken, and the amount of historic data considered for computation depends on the number of days you selected on the Filters page.
You can have multiple simulations generated (up to 10 simulations at any point of time) for review and comparison with one another. As you create simulations exceeding the total count of 10, the oldest simulations are automatically removed from the simulations list, so that the total count of simulations available to you is always 10. You can run multiple simulations simultaneously as well.
To generate a simulation:
- Create a new filter or make necessary change(s) to existing filter(s). The Reset, Test (highlighted), and Save buttons are displayed at the bottom of the Filters page.
- Click Test. The simulation is generated and is available in the View Simulation drop-down that appears on the Filters page.
Depending on whether a simulation is complete, in progress, or failed; the status of the simulation is shown as Completed, In Progress, or Failed respectively.
Note: You can always apply the change while the simulation is still in progress.
- Click Save on the Filters page if you want to save the changes to take effect. The confirmation dialog box appears.
- Click Yes. The changes are applied, and all other simulations (if any) are deleted from the View Simulations drop-down.
View a Simulation
To view a simulation:
- In the View Simulations drop-down, click the simulation that you want to view. The selected simulation is displayed. Click the link icon to open the simulation in a new tab in your browser.
Note: The performance forecast in the simulation is based on the changes and the historic data of the time range you selected on the Filters page. For example, past 30 days.
- Click Apply if you want to apply the changes.
- Click Save. The confirmation dialog box appears.
- Click Yes. The changes are applied, and all other simulations (if any) are deleted from the View Simulations drop-down.
Compare and Optimize Filters Performance
When you have multiple simulations, you can compare the performance impact due to the changes in filters, and apply the change that is most optimal in terms of better performance results.
- In the View Simulations drop-down, click the link icon next to a simulation.
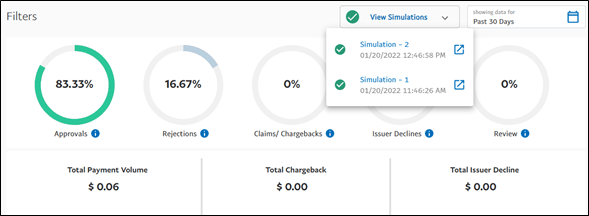
The selected simulation opens in a new tab in your browser.
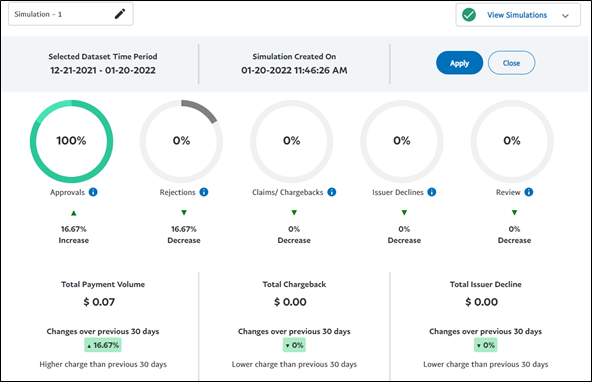
- Compare the metrics of the simulation with the current metrics on the Filters page. For example, in the above scenario, you can see changes in Approvals, Rejections, and Total Payment Volume metrics.
Note: All metrics in the simulation are indicated with the percentage of increase or decrease if the changes done to filters are applied.
- Click Apply in the simulation tab if you want to apply the changes.
- Click Save, and then click Yes on the confirmation dialog box that appears.
The changes are applied, and all other simulations (if any) are deleted from the View Simulations drop-down.
Time-range Change During Comparison
When you have a simulation open in another tab, and you change the time-range on the Filters page, you will see an alert that the time-range on the Filters page and the simulation tab are different.
Note: It is not advised to compare metrics in such scenario. You must always compare the simulations computed with data of the same time range.
Rename a Simulation
To rename a simulation:
- In the View Simulations drop-down, click the simulation you want to rename.
- Click the edit icon next to the simulation name.
- Enter the new name for the simulation and click the tick-mark icon.